With my health it's not always possible to guarantee a weekly post. In fact you cannot guarantee you'll be able to do anything regularly. So often you start with good intentions, but you end up in a heap in bed or on the sofa unable to even type because your fingers hurt and your brain is so full of fog you can't remember how to type.
 |
| You can use any powdered colour you like to home colour your non-pareils. That means if you've used a powdered colour for the fondant or frosting you can use the same colour for the sprinkles, or a dramatically different colour to highlight them. |
An invisible illness doesn't cease to be a illness just because people cannot see a cause, or because I'm having a good enough day to be bright and bubbly while I'm wheeled round the shop. I've been told I can't be ill because I'm happy, that I shouldn't be going out at all if I'm
that ill; all of which achieves only one thing - it depresses me. It makes me focus on what I can't do instead of the amazing things that I can still achieve.
 |
| I love using this colour. As strong as turmeric it gives pretty, vibrant shades of yellow to the nonpareils. |
One of the things that makes me very happy is writing this blog. Being able to hand out my knowledge and pass it on to you, the readers, to enjoy doing the things that I love doing so very much. Even when I can't do them myself any more. Going through pretty pictures of lovely colours makes me happy, too!
 |
| The tumeric yellow with the lovely non-pareils it coloured. As you can see, I have quite a range of powder colours |
This week was one of those difficult weeks where I couldn't bake, where I had to lay back and rest and catch up with all the things I'd set aside for times like this - catching up on the blogs, editing
photographs, getting back in contact with people on Facebook and learning what's been happening in the baking world.
So, whilst confined to the sofa I'm offering you a couple of little bits that I put together earlier, but which weren't enough on their own to make a blog. How to colour your own sprinkles and a test of grinders and their ability to grind things properly. I do hope they help you to make the most of your kitchen equipment and to have a delightful display of coloured candies to top your own creations with.
 |
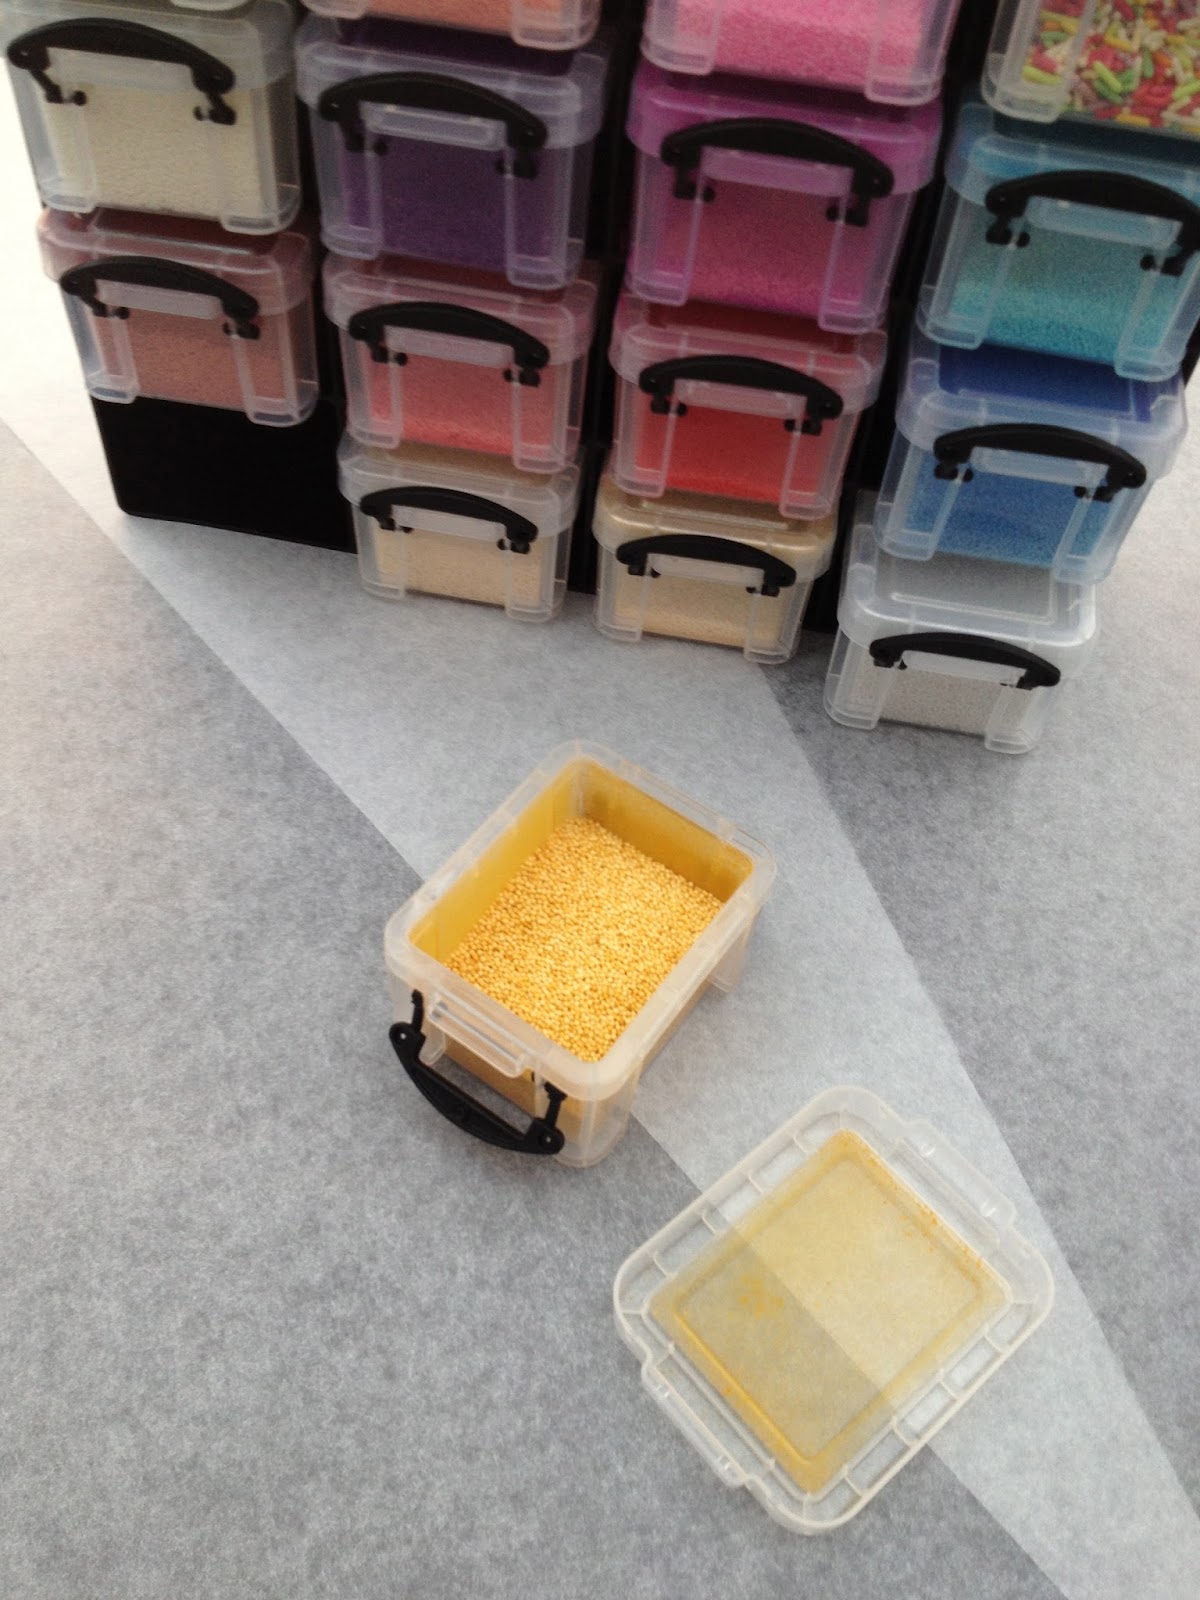
| My other little storage secret - Spice Stack boxes from Amazon. Originally designed to hold 72 spice jars in three trays that pull out from the tidy box, they now hold my hundreds of jars of powdered colours and dusting powders and glitters and sprinkles that come in tiny tubes, and anything else very small that's dry and used for dusting, colouring or decorating my cakes |
Colouring your own sprinkles is the easiest thing in the world. You get some white sprinkles or, in this case, nonpareils, and some powdered colours. You combine the one with the other and shake until it's done. By the way - don't try this with the glittery ones, it just doesn't work. I tried it myself and ended up covered in glitter but with none of it sticking to the coating of the candy. Sad, but there you go.
So - here's my little storage box, filled with lots of lovely sprinkles. There are still a couple of boxes of plain ones to be coloured up as needed. I have yellows, blues, reds, pinks, purples, gold and silver. If it's a dusting powder or a powdered colour, it'll work! It's because they stain, they don't just sit on the sugar coating but they give over their colour to it.
 |
| I used these tiny organiser boxes from Rymans, made by Really Useful Box - they are really useful. |
Put your sprinkles in a jar or box or whatever container you're using, add a small dash of the powder, to start with, and shake well in all directions. The powder will constantly filter down as you shake, so tip it sideways, tip it upside down, and shake it all around to make sure all the sprinkles get the colour. The more powder you use, the richer the colour on the sprinkles, and the more you shake, the more even the colour.
 |
| Commercial coloured sprinkles, plain white nonpareils and home coloured - you choose! |
I don't always want that, so I tend to make sure about half the sprinkles are done dark, first, then I add more sprinkles and carry on shaking to get a mixture of tones. When they look how you want them to look, stop shaking! Don't add too much powder, it's not needed and it will only end up in the bottom of the pot. These particular nonpareils were supplied to me by the kilo from the lovely Alison at pink*hibiscus on eBay or you can contact her direct for special orders at alisonsmith100@gmail.com
I have to say, of all the nonpareils that I have bought over the years, these ones are working especially well, and her kilo price is very good value, too. I shall certainly be buying more sprinkles from the lovely Alison.
 |
| My tiny tower of colour - not so tiny, but very colourful |
Ok, onto the grinder test. I wanted to grind sesame seeds; sadly, like most oily things, if you try this you tend to end up with butter or a very clogged grinder. So over time I had acquired several means of doing things like grinding or milling grains and seeds. I still haven't found one that reliably crushes sesame seeds without pulping them, but I'm working on it. Meantime I have several grinders or things that also grind, and I never know which one to use. This means it's time to do some testing!
Having read about lemonade powder cookies and frosting and such I found some lovely berry tea granules that I wanted to try for the same things - we can't get lemonade powder in the UK, so this was a potential substitute with no artificial sweeteners or other allergy inducing contents. We love Lidl!
The granules were clearly going to be the perfect thing to test the grinders with. The rules were that the granules were put into the machine, either as many as I had or as many as the machine would take, ground until I couldn't ascertain any more changes occuring, so it's pretty much done all it's going to do, then removing the granules to a sieve.
 |
| Kitchen Aid artisan blender - not as good as it could be, to be honest, in several ways. |
To start I went to the largest bowl of the 3 I was testing - the Kitchen Aid Food Processor. Having a clear, plastic bowl for processing foods meant that I could watch the process easily to see how it was going, both from the top and from the side.
 |
| Easy to see the big bowl didn't work |
Sieving was first to be done by shaking only, with tapping allowed at the end of the powder having gone through, just to take out the bits caught in the mesh that will actually go through, but only a few taps, no more. The remainder in the sieve were to go to the next grinder.
 |
| Ready to go with the top bowl in place with the smaller blade attached to it. |
The granules put in the Kitchen Aid looked good at first, but when I sieved the powder it turned out only about a fifth the granules had been crushed. It also spat the powder out the lid, over the sides where there is no real seal. There are a lot of things I love about my KA food processor, but for every love there is a hate - and the lack of seal on that lid is very high on the hate list along with the bowls ability to scar badly!
 |
| Small bowl in situ, inside the larger bowl |
Because I'd used the largest bowl, designed for chopping not grinding, I wasn't overly surprised at the poor result. Next I used the smaller bowl that sits inside the big bowl, and the shorter blade, which is intended for grinding. I have to say, this was a great disappointment. It didn't actually process anything smaller than it went it. Total loss. Maybe if I'd tried the granules up here first the results would be the other way round; but either way you can say that the Kitchen Aid clearly doesn't grind things very well at all.
 |
| The smaller bowl for the Kitchen Aid |
So - biggest bowl on the Kitchen Aid with the relevant blade only did 20% of the granules, and the smaller bowl with the relevant blade did absolutely nothing. Not very good, but then this is a domestic piece of equipment intended for preparing vegetables, making pastry and so forth; so for domestic kit not designed to do the job it did its best. And I have to say, it knocks out amazingly good pastry in about 90 seconds flat!
 |
| Very not good - but the pastry is amazing! |
On to the next machine, and a professional piece of kit this time. The Waring Pro Prep Commercial Chopper And Grinder made by Cuisinart
. This machine comes with two bowls, one marked chop and one marked grind.
 |
| Waring Pro Prep Commercial Chopper and Grinder by Cuisinart with chop bowl and blade fitted. |
The grind bowl comes with a different, much lower blade designed to get as much as possible ground small. It is also fitted with a blade like attachment on the base of the bowl and a serrated blade on a protuberance on the lid - closing down the space so grains can't escape when you're grinding. This looked like a good idea and I was hopeful that it was going to work.
 |
| Yup, has it on the bowl - GRIND |
I ground it the same way as the first one, until I couldn't see any more changes happening. It took about the same time, too. A couple of minutes straight run, then a few pulses and it was done. Or finished, at least! Again, having a clear plastic bowl paid dividends in being able to observe the process from the top or the side.
 |
| Looking good so far! |
Pouring the granules into the sieve and shaking it we did really well, almost 90% of the remaining granules were powder. A significant increase on the previous machine. Also, the bowl being about half the size of the KA it meant that half the granules was plenty to test it at a max setting. I was really quite pleased with this - but we still had about 8% of the original amount of granules left.
 |
| Not so good after all. |
Enter machine number three, the smallest, but still a professional piece of equipment; the Waring Professional Spice Grinder. This suffers from having a metal jar with the blade fixed in the bottom of the jar, so you cannot change the blade, and you cannot see what's happening in the jar.
 |
| Waring Professional Spice Grinder |
The jar slots into the base and you have a clear cover that goes over the top of the jar and engages with the base so you can press the large button on the top to set the motor running. This also contrives to ensure you can't see what's going on because your own hand is now in the way.
 |
| Not a lot of granules left to grind |
The machine comes with three jars and three lids so that you can save your spices in the jar if you wish - assuming you only ever use three spices! You can, of course, buy extra jars and lids if you want to go this route and being stainless they won't hold smells, either.
 |
| The only machine to try to recreate a desert sand storm in my kitchen. Not to self - next time leave it a while before you disengage the jar |
Being a spice grinder, designed to cope with hard shells, I was hopeful that this would be the one to do the job. Despite being half the size of the previous bowl I could only fill the jar enough to cover the blade with what was left in the sieve; and being unable to watch the process I had to listen for the tone of the motor.
 |
| Looks promising from up here |
When it's working it meets resistance, so the tone of the motor is different to when the blade is spinning freely. When I had heard two changes of tone I opened the lid and took a look.
 |
| Looks very promising here, too. Let's give it a shake |
From the top the results looked good, but I was aware that heavier particles would be underneath, so it wasn't necessarily a good result yet. I could have taken it off too early. However, when I tipped the jar into the sieve the contents went straight through without hesitation. It was a 100% success! I was seriously happy.
 |
| One very empty sieve |
Knowing what your kitchen equipment can do, and to what level it can do it, is just as important as knowing your oven temperature or which knife to use for which job. If you don't know it then you've not only wasted money buying the equipment; but you will end up with several pieces of equipment that do the same job and you just don't realise it. Clearly these three machines do three very different jobs to different levels of precision. Knowing that means I can go straight to the machine I need for the job.
 |
| Pouring the powder back into the jar I had to use a chopstick to clear the log jam in the funnel |
If I want to chop peppers or make amazingly good shortcrust pastry, I'll use my Kitchen Aid Food Processor. If I want to roughly chop nuts or fresh herbs I'll go to the Waring Pro Prep. But if I want to mill spices or grains I'll go straight to the Waring Spice Grinder. Since, under normal conditions, I do all of those jobs, it's great to know that I have the equipment I need to do it right.
 |
| Lemon granules in a full jar showing where we started and powdered berry tea granules which now fill four fifths of the jar showing how we ended up. Powdered! |
Sadly I'm still stuck with not having anything that will crush, crack or lightly grind sesame seeds without making them into sesame butter. Very taste, but not what I want in my recipes!
Waring Professional Spice Grinder and Waring Pro Prep Commercial Chopper And Grinder from Nisbets.
Kitchen Aid Food Processor from Kitchen Aid
Pink Hibiscus on eBay for all your spinkles and nonpareils.